merchant, an extension of the old man that can also barter items with the player.
Normal NPCs
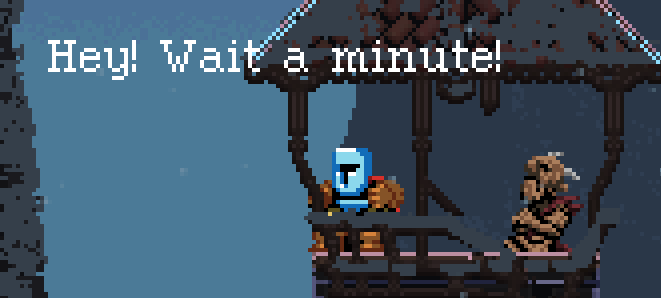
Normal NPCs (or by their technical name Old Man NPCs) are a normal entity in-game that speaks once you trigger its hitbox (if they have something to say).
Adding a new NPC
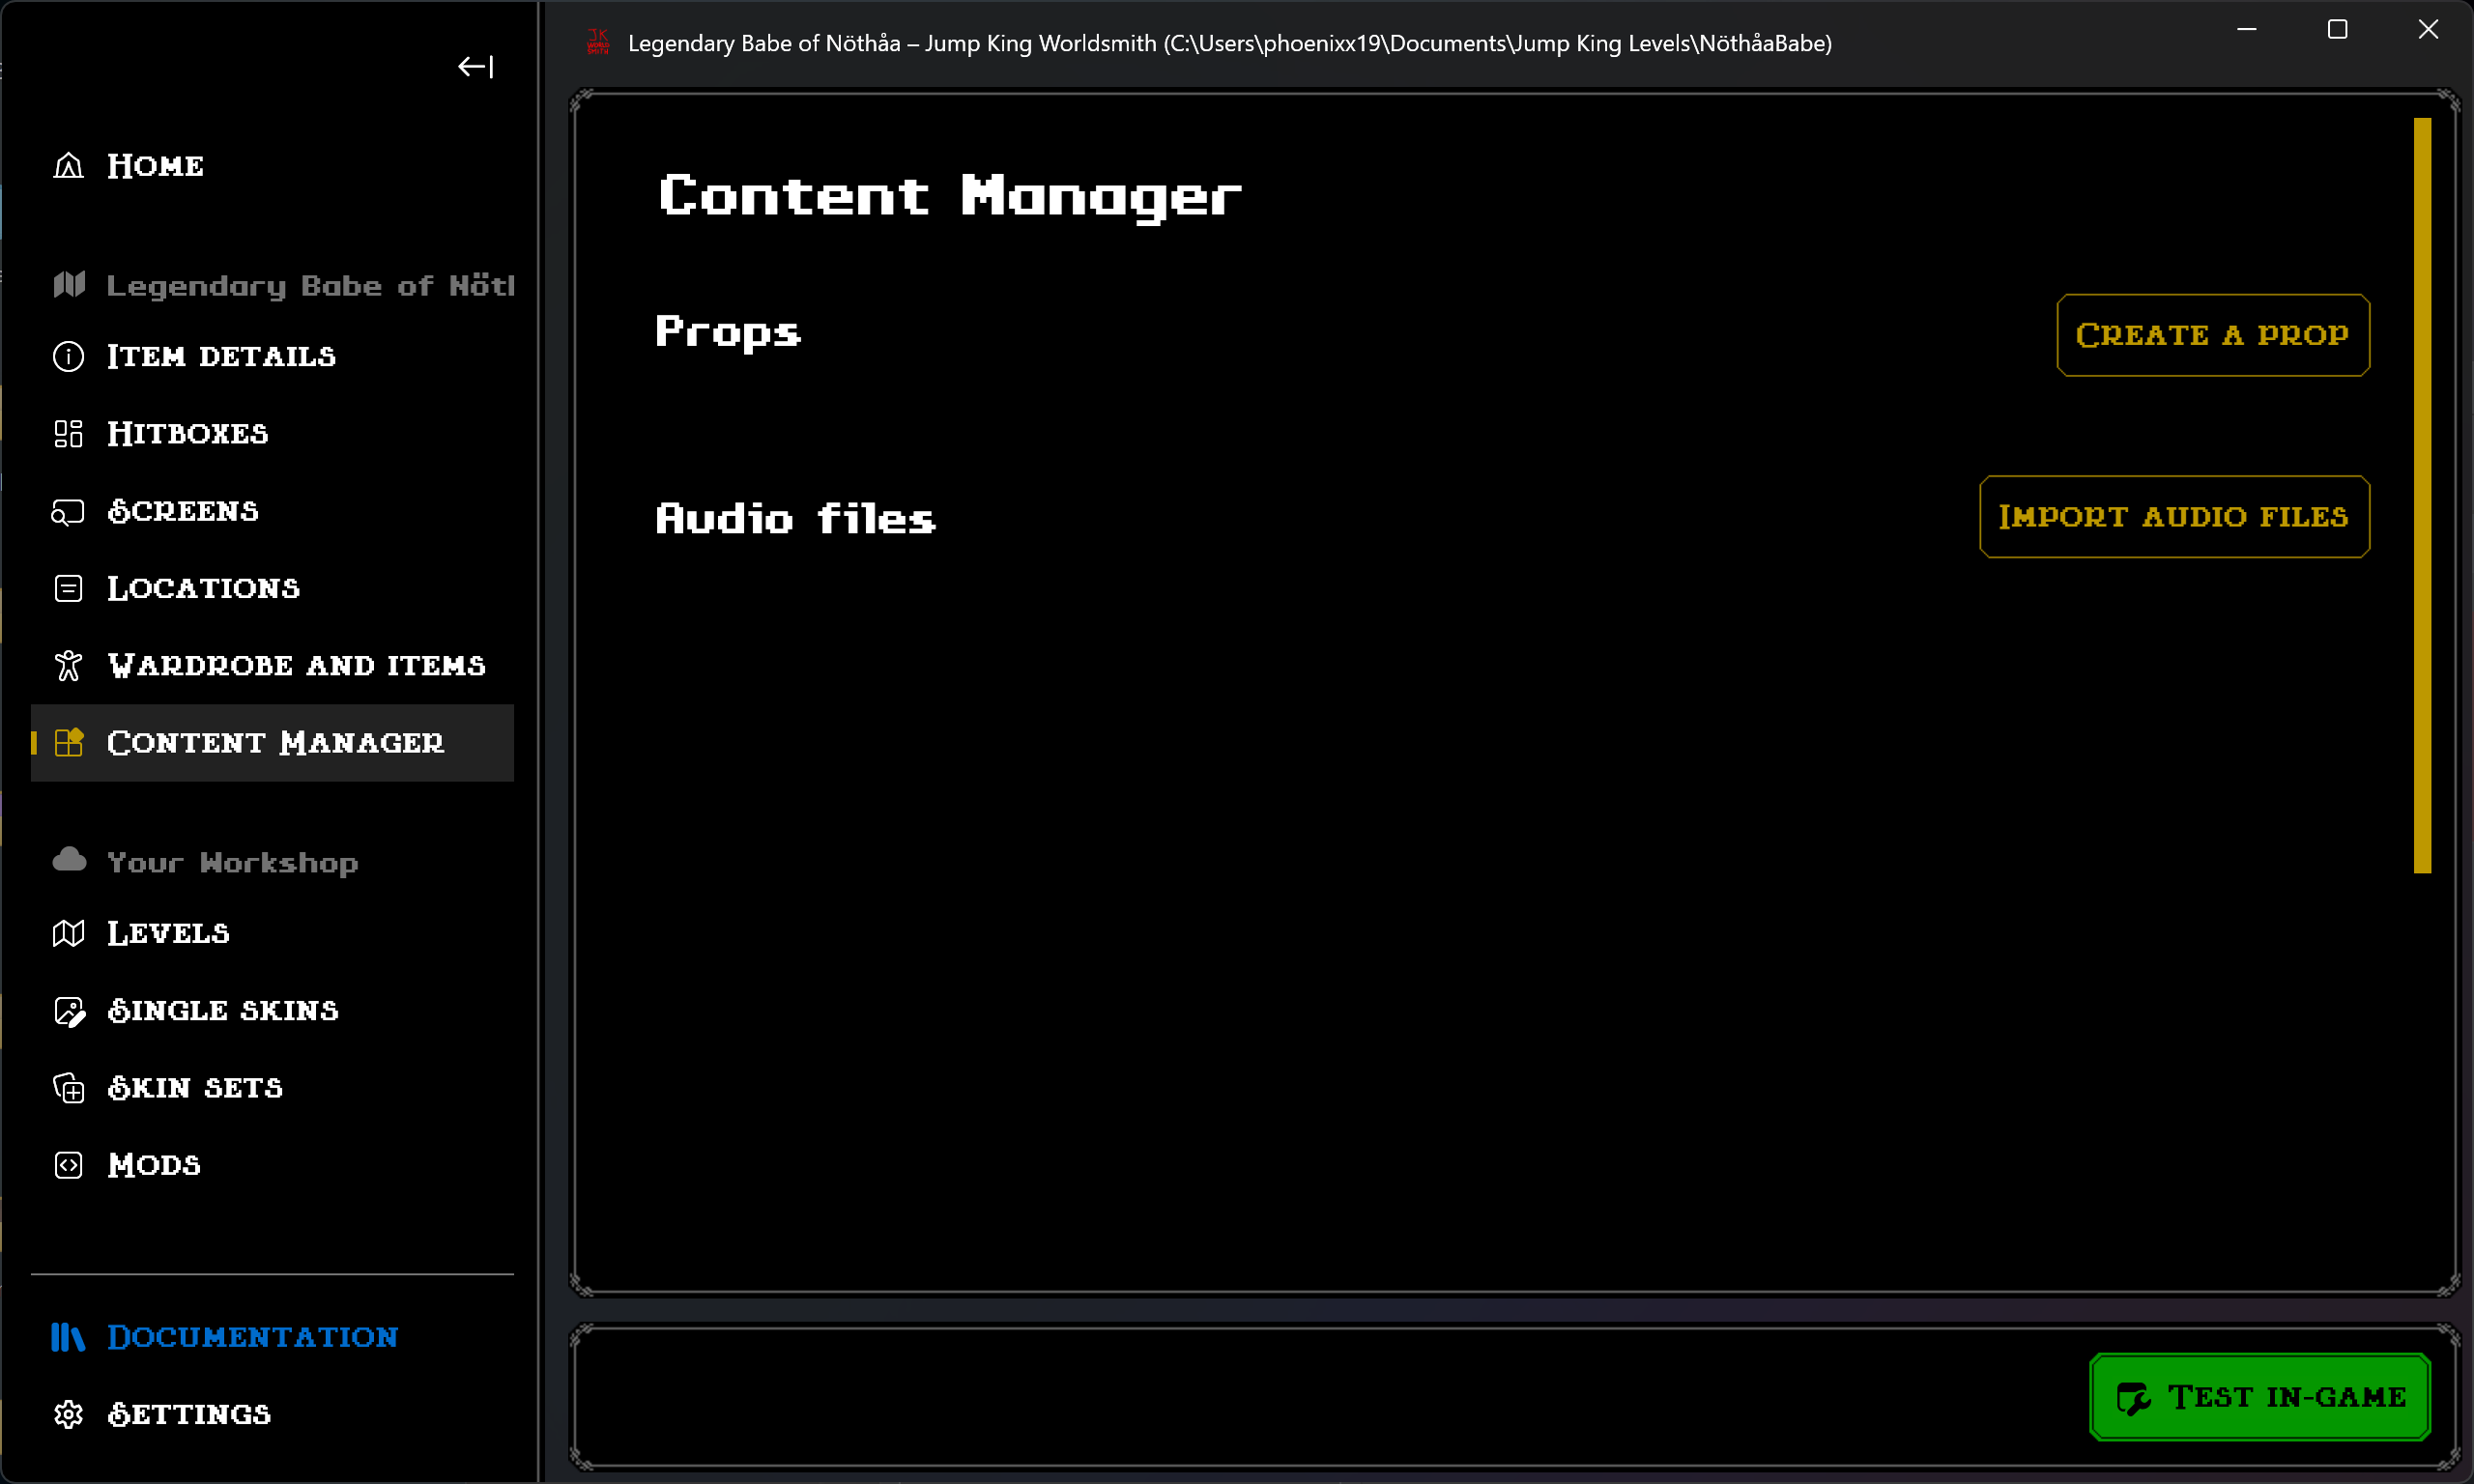
Navigate to the Content Manager page.
Scroll until you find an header “NPCs”.
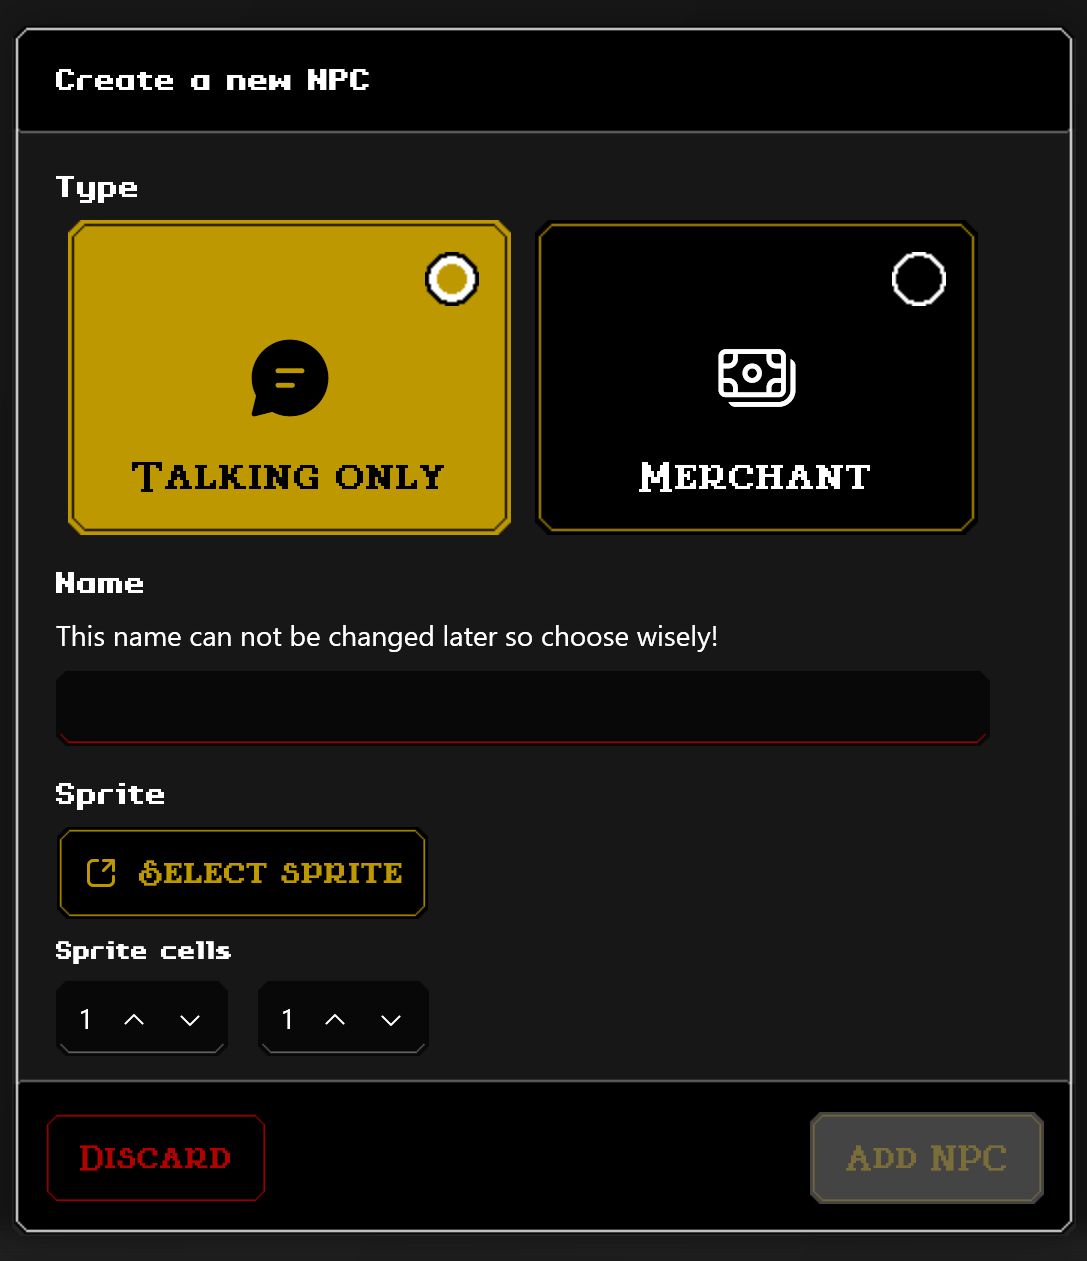
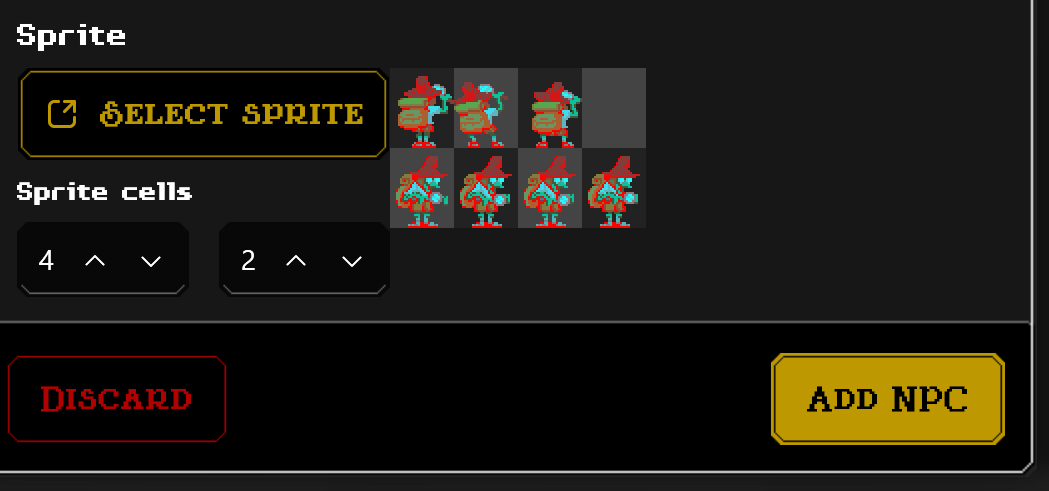
Click on the Create a NPC button found on the right side. A prompt will show up asking the necessary details for your NPC. The following image is how it should look like.
Select the appropriate type for your NPC (talking only) and write a recognizable name for your NPC, you won’t be able to change it later!
Click on Select sprite.
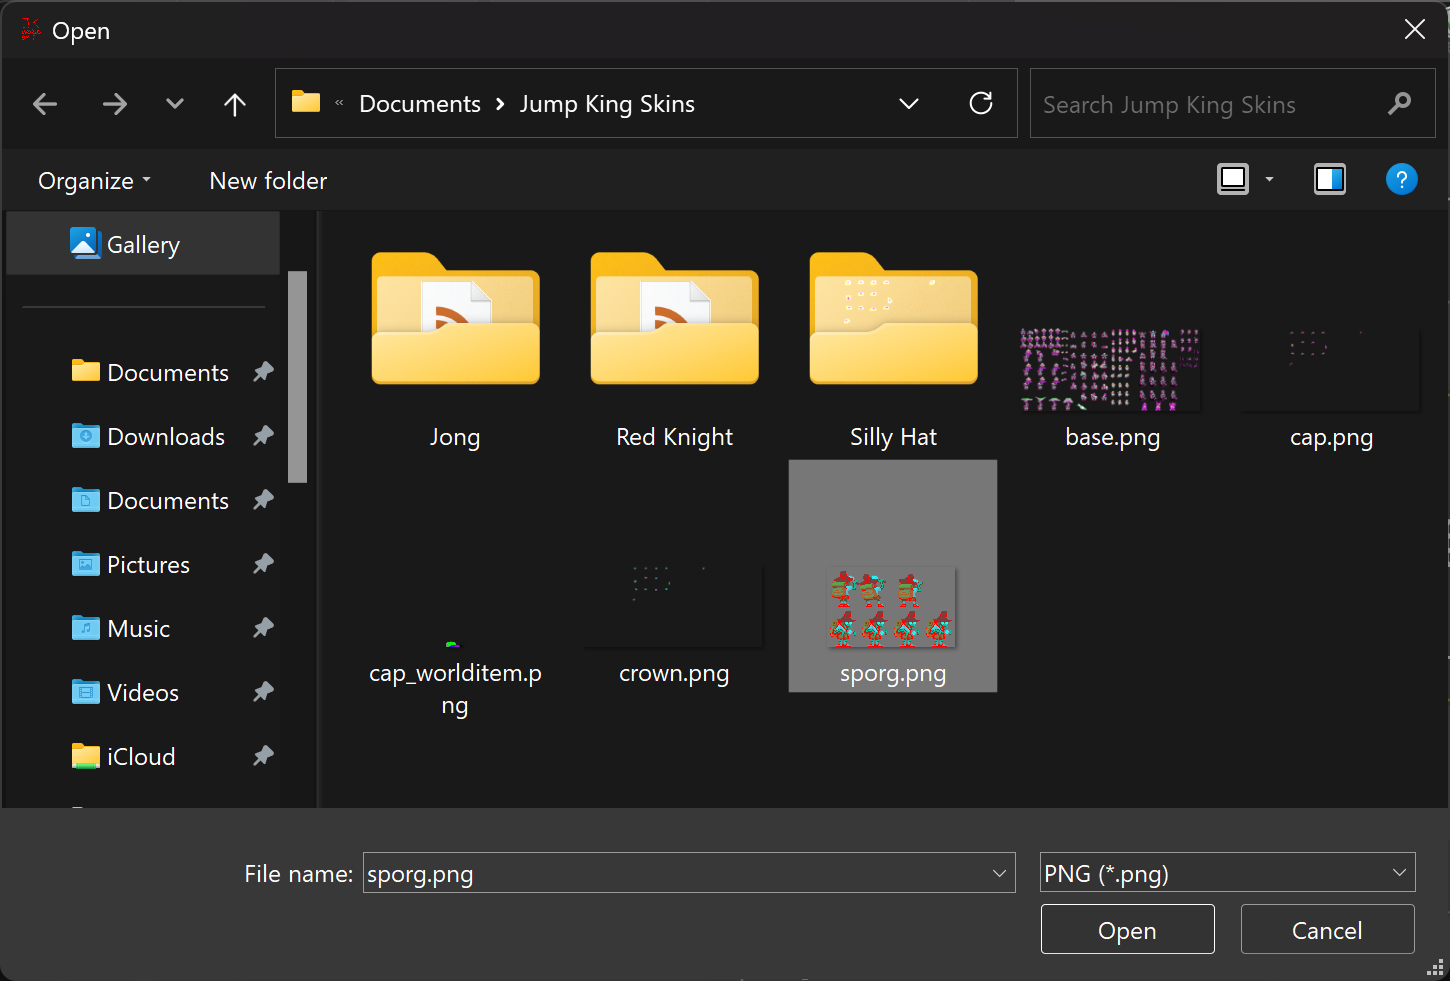
A new prompt will show up asking you to select a sprite for your NPC.
After selecting your file, click Open.
Make sure the row and column count align with your sprite sheet.
Click Add NPC and you should see your NPC below “Talking only”.
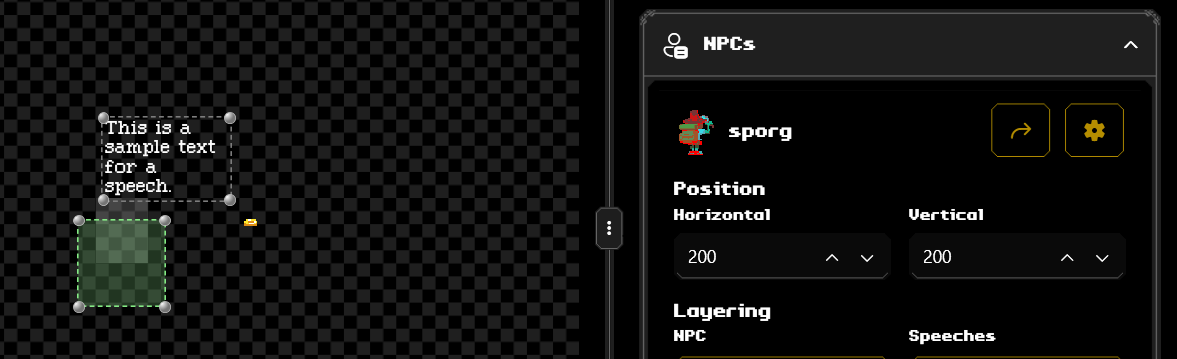
Changing an NPC’ setting
Navigate to the Content Manager page.
Scroll until you find an header “NPCs”.
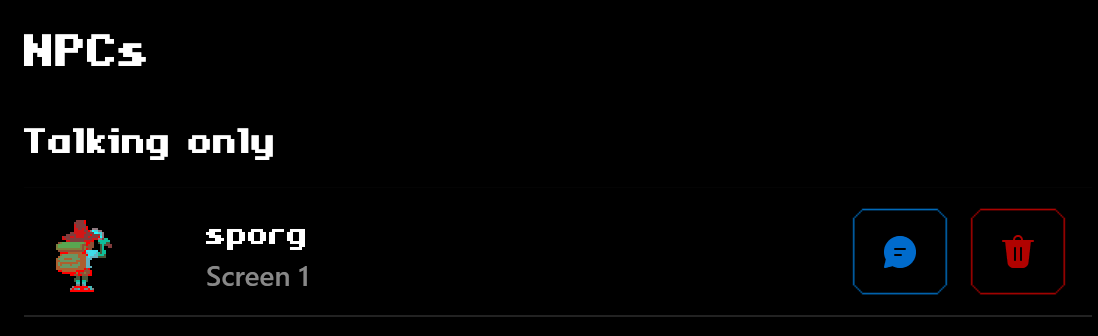
Click on the NPC you’d like to edit its settings.
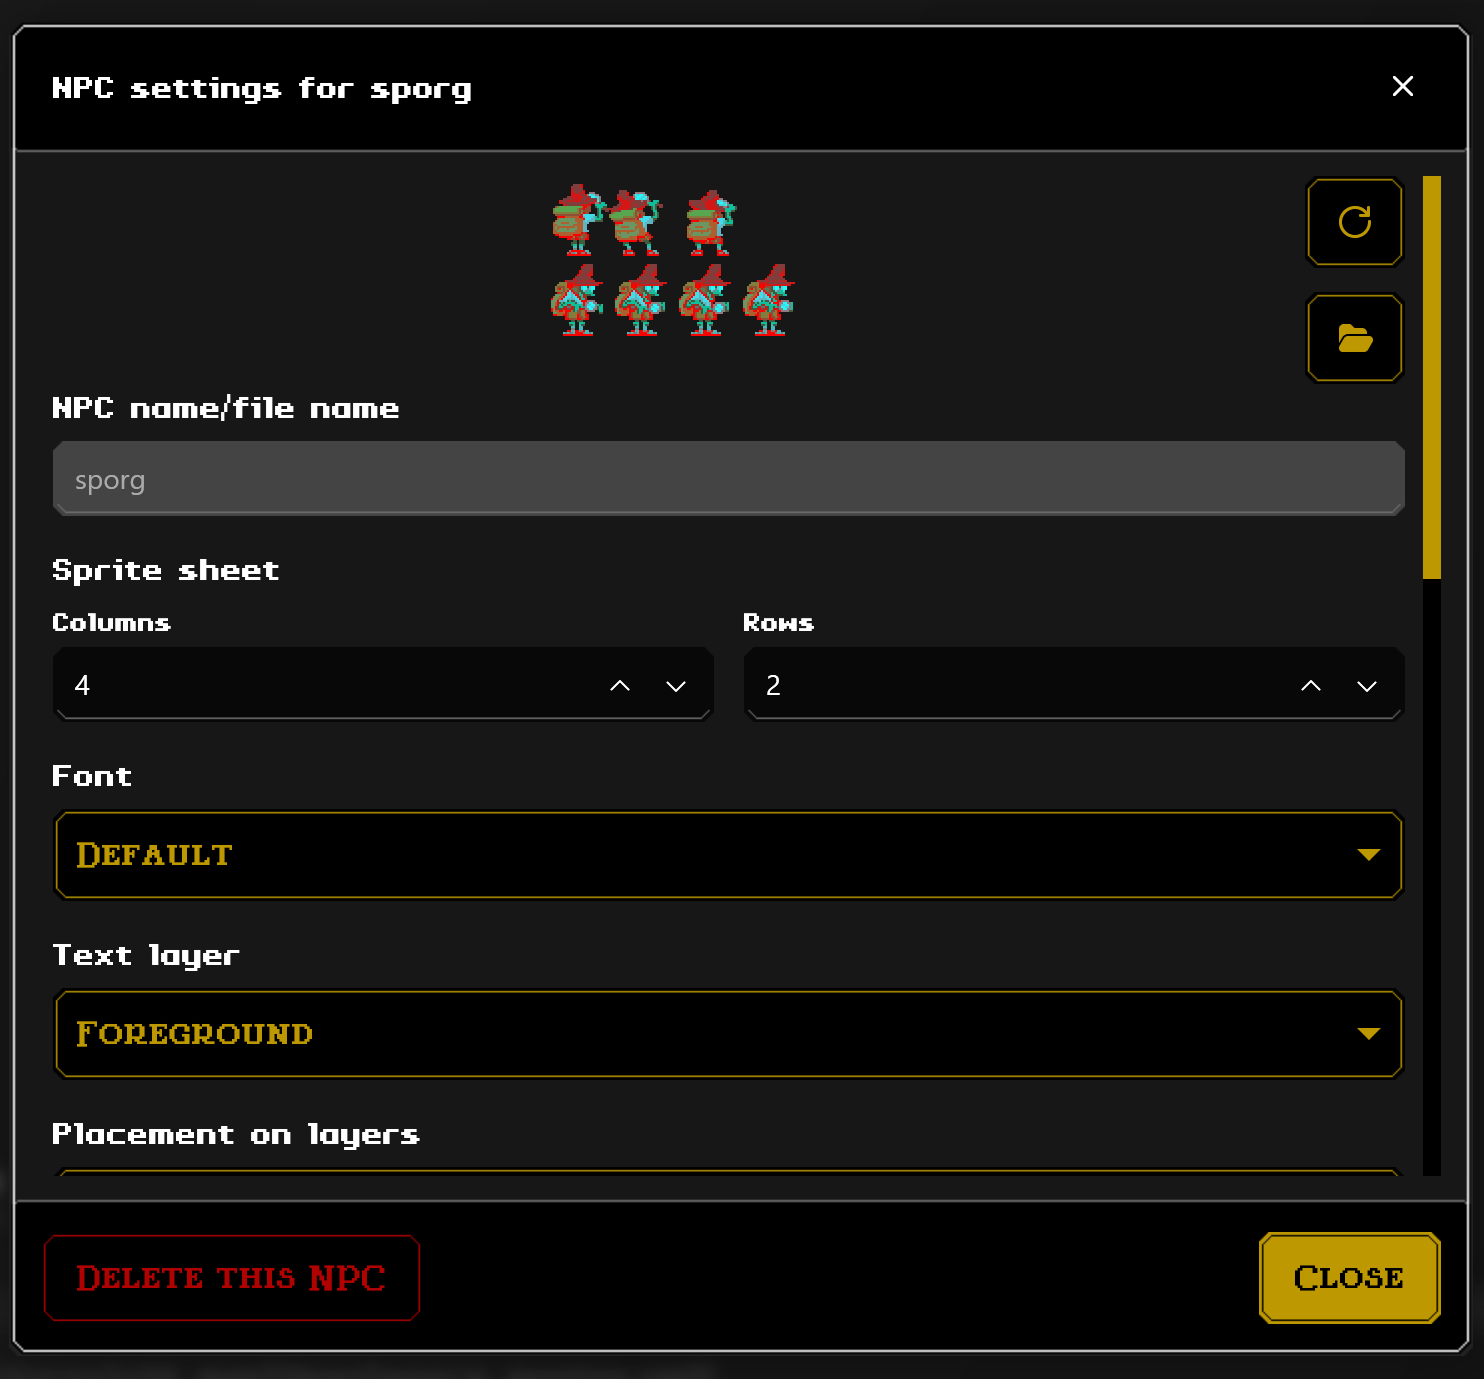
A prompt will show up with the NPC’ settings, from here you can modify as you will.
Changing an NPC’ speech
Navigate to the Content Manager page.
Scroll until you find an header “NPCs”.
On the NPC you are looking to modify, click on the blue button that contains a text bubble.
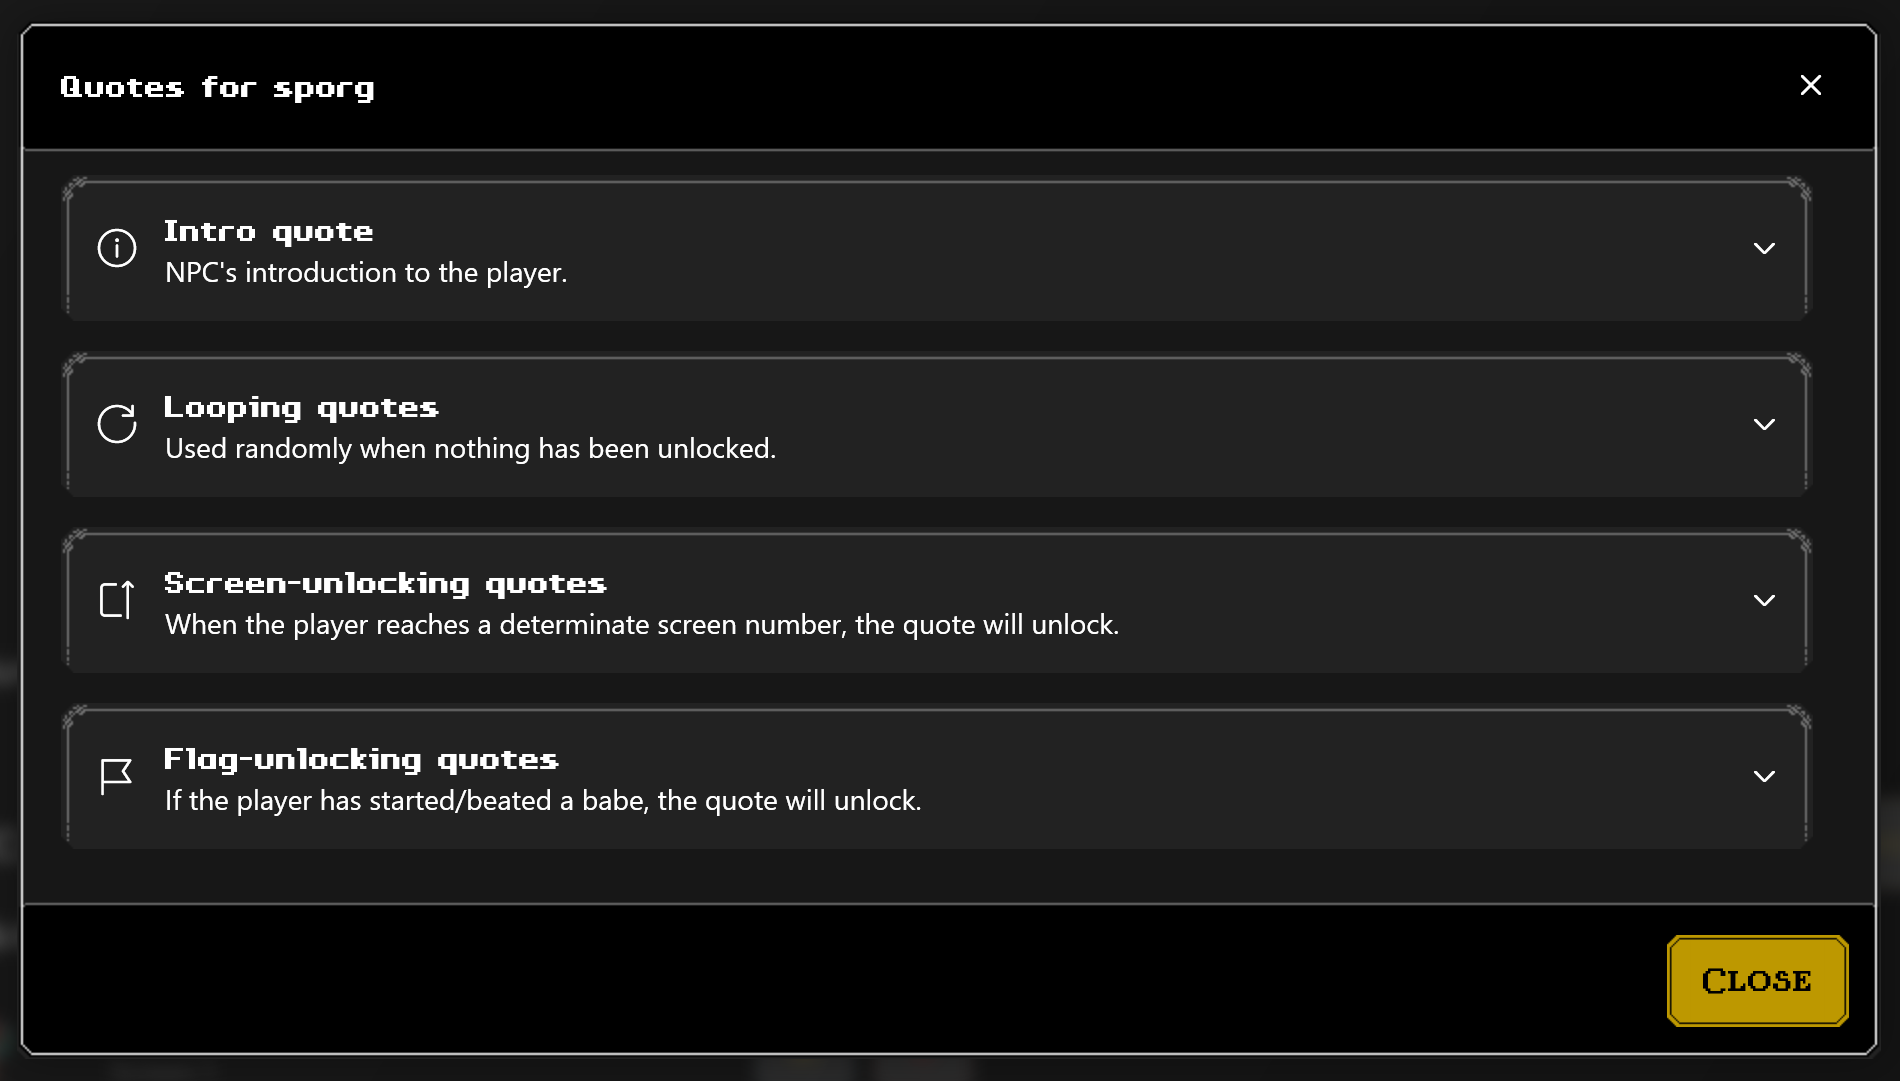
A prompt will show up with the NPC’ quotes, from here you can modify as you will.
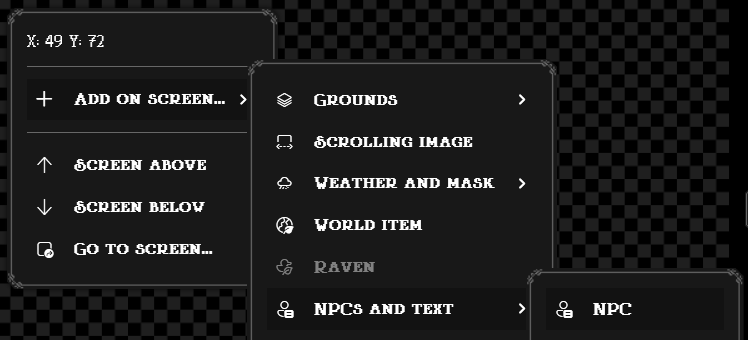
Moving an NPC from a screen
Optionally, if you are on the Screens page. You can decide to add (move) to a specific screen.
Right-click onto the canvas on the left side of your screen (where you have your level preview) and select Add on screen…, then NPCs and text, then NPC.
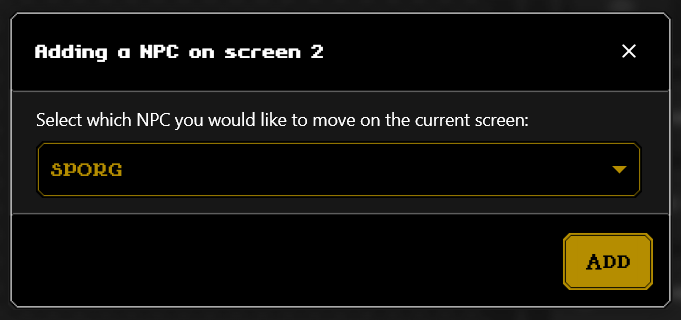
Once clicked, a prompt will ask you to select the NPC that you want to move onto the current screen.
Once selected, click Add. Your NPC should appear on your preview.
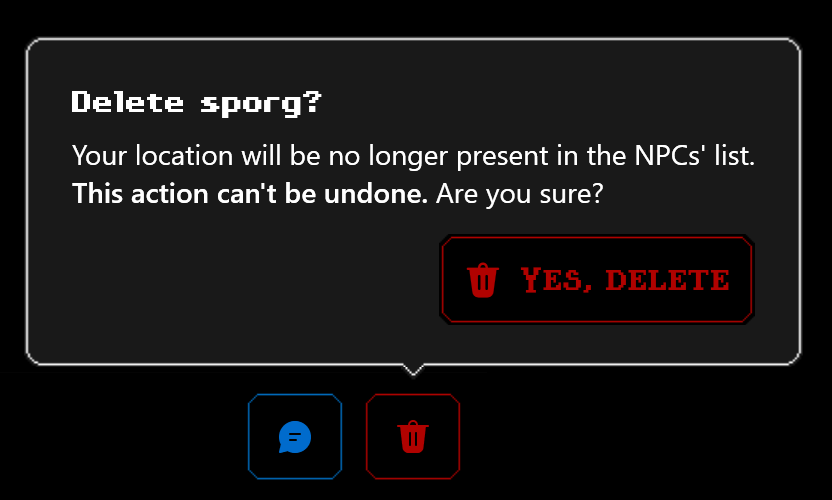
Removing an NPC completely
Navigate to the Content Manager page.
Scroll until you find an header “NPCs”.
On the NPC you are looking to modify, click on the red button that contains a trash bin.
A prompt will show up asking for confirmation of your deletion. Click Yes, delete if you are completely sure.
After clicking it, your NPC will be removed completely. And you shouldn’t see it both in the Content Manager and Screens pages.
Steps (without Worldsmith)
Retexturing a normal NPC
To replace a spritesheet of an NPC:
Convert a new image into a packed XNB file.
Name it as the NPC you want to retexture.
Place the file in props/textures/old_man and replace the file.
If you modified the sprite sheet, you will need to modify the sprite sheets and the animation settings inside your NPC’s configuration file.
While the textures for both needs to be inside props/textures/old_man, the quotes and settings of each NPC is stored based of their type:
old man, is stored inside props/textures/old_man/lines
merchant, is stored inside props/textures/old_man/merchant
General settings
An NPC contains the following settings:
name of the NPC (leave as is),
sprite sheet,
position,
home screen,
font,
text layer,
npc layer,
random count
Sprite sheet
The sprite sheet (or sprite cells) is the combination of the rows and columns count.
Setting the sprite sheet
Search for the sprite_cells tag.
Modify the X value with the column count in your packed XNB file.
Modify the Y value with the row count in your packed XNB file.
Position and home screen
The following settings are related to the position of your NPC. The home screen will set the NPC to a specific screen, meanwhile the position will set the position inside the screen of your choice with X and Y coordinates.
Setting the position
Search for the position tag.
Modify the X and Y values with the relative values of your choice.
a integer number between 0 and total number of frames in the sprite sheet
Setting one of the settings above
Check if the tag you are looking exists.
If the tag doesnt exist, create it like this example below:
<text_layer>VALUE_HERE</text_layer>
Replace VALUE_HERE with the possible values following the table above.
Speech bubble and trigger box, talk-related settings
All settings that will about triggering the NPC, its talk speed, talk delay and speech bubble size.
Speech bubble format
The bubble format can help you format text the way you want it; by aligning it differently, setting the anchor for your text and deciding the maximum width of the NPC’s speech.
Setting the speech bubble format
Search for the bubble_format tag.
Replace the direction value with either Left or Right, depending where you want the text to align.
Replace the width value with your speech maximum width.
Trigger box
The trigger_box tag is needed to trigger the NPC to speak.
Setting the trigger box
Search for the trigger_box tag.
Modify the X and Yvalues with relative values of your screen.
You can easily see the values in the build mode by changing it from Absolute to Relative from the Pause Menu. Also thanks to the “Hitbox first” toggle in the build mode, you can easily see where the hitbox is, and fix it with ease.
Modify the Width and Heightvalues with the size wanted.
By default, your item will start from the X and Y values given and expand right and down. If you want your item to be centered, change both hitbox_center’s X and Y to 0.5, or if you want it to start from the right, change it to 0. If this sounds confusing, test it in-game!
Talk delay and talking speed
You can also change:
the talk delay, which is the delay from when you enter the NPC’s hitbox and when the NPC start talking;
the talking speed, which is the speed of which every letter spawns on-screen
Setting the talk delay
Search for the talk_delay tag.
Modify the talk_delay to whatever value you want.
The value equals in seconds.
Setting the talking speed
Search for the talking_speed tag.
Modify the talking_speed to whatever value you want.
Higher is faster.
Animation settings
With the following settings you can set the main two animation cycles: talking and busy (time-out/pause) animations. In order to set this, it is recommended that you have your sprite image opened on the side so you can check while adding them.
Remove the whole AnimationFrame that contains the sprite_index that equals to your frame index.
Busy animation
Setting the busy frames
The process is the same as the talk animation but you need to search for the busy_animation instead.
Speeches
The speeches are the text that will show on screen (what will the NPC say).
There are 6 different types of speeches which can be used and their use can vary:
Type
Usage
Will they get repeated?
Intro quote
Used to introduce the NPC to the player, it is the first thing an NPC will say if it has any and if there isn’t any flag quotes
No.
Flag quotes
Used to determine if the player has beaten an existing map (such as Main Babe, NB+ or GotB), it will not be looped.
No.
Looping quotes
Generic quotes and speeches.
Yes.
Screen quotes
Unlocks new quotes by reaching a specific screen.
Yes.
Item quotes
Unlocks new quotes if the user is wearing an item.
Yes.
Fall quotes
Unlocks new quotes by reaching a range of falls.
Yes.
Make sure you understand the difference between quotes and strings before you start. Strings are usually made of a phrase or portions or a phrase (depending on the size of the speech bubble); a group of strings will play one string after another without big pauses. A quote is a group of strings that the NPC will read through before being quiet for some seconds.
Intro quote
Setting an intro quote
Search for the intro_quote tag.
If you are missing intro_quote paste the following snippet below talking_speed.
<intro_quote><lines><string>My first speech!</string><string>What what? Did I say that?</string></lines></intro_quote>
Get rid of all the string tags that could be present.
Copy the following snippet:
<string>YOUR_STRING_HERE</string>
Replace YOUR_STRING_HERE with your intro string.
You can add as many string as you want, just copy the snippet in a line after your closing string tag and replace YOUR_STRING_HERE with your second, third… string.
Flag quotes
Setting flag quotes
Search for the flag_quotes tag.
If you are missing flag_quotes paste the following snippet below talking_speed.
<flag_quotes><OldManFlagQuote><flag>CompletedNormalGame</flag><quotes><lines><string>So tell me...</string><string>is the Babe any good?</string></lines></quotes></OldManFlagQuote></flag_quotes>
Get rid of all the string tags that could be present.
Copy the following snippet:
<string>YOUR_STRING_HERE</string>
Replace YOUR_STRING_HERE with your flag string.
You can add as many strings as you want, just copy the snippet in a line after your closing string tag and replace YOUR_STRING_HERE with your second, third… string.
You can even add as many group of strings as you want by copying the lines tag and pasting it below the closing tag of the previous lines.
You can even add more flags!
By copying the existing entire OldManFlagQuote (or copying it from above) and pasting it right after the closing tag (in a new line) of the OldManFlagQuote you’ve just done, you can add another flag and a bunch of new speeches!
Looping quotes
Setting looping quotes
Search for the looping_lines tag.
If you are missing looping_lines paste the following snippet below talking_speed.
<looping_lines><OldManQuote><lines><string>This is looped.</string><string>Did I say that already?</string></lines></OldManQuote></looping_lines>
Get rid of all the string tags that could be present.
Copy the following snippet:
<string>YOUR_STRING_HERE</string>
Replace YOUR_STRING_HERE with your flag string.
You can add as many strings as you want, just copy the snippet in a line after your closing string tag and replace YOUR_STRING_HERE with your second, third… string.
You can even add as many quotes as you want by copying the OldManQuote tag and pasting it below the closing tag of the previous OldManQuote.
Screen quotes
Setting screen quotes
Search for the screens tag.
If you are missing screens paste the following snippet below talking_speed.
<screens><OldManScreen><screen>YOUR_SCREEN_NUMBER</screen><quotes><OldManQuote><lines><string>Finally you got there!</string><string>It took you some time, huh...</string></lines></OldManQuote></quotes></OldManScreen></screens>
Replace YOUR_SCREEN_NUMBER with the screen number where you want the quote(s) to unlock.
Get rid of all the string tags that could be present.
Copy the following snippet:
<string>YOUR_STRING_HERE</string>
Replace YOUR_STRING_HERE with your string.
You can add as many strings as you want, just copy the snippet in a line after your closing string tag and replace YOUR_STRING_HERE with your second, third… string.
You can even add as many group of strings as you want by copying the OldManQuote tag and pasting it below the closing tag of the previous OldManQuote.
You can even add more screen checks!
By copying the existing entire OldManScreen (or copying it from above) and pasting it right after the closing tag (in a new line) of the OldManScreen you’ve just done, you can add another screen check and a bunch of new speeches!
Item quotes
Setting item quotes
Search for the items tag.
If you are missing items paste the following snippet below talking_speed.
<items><OldManItem><item>YOUR_ITEM_TRIGGER</item><quotes><OldManQuote><lines><string>What have you got there?</string><string>Can I also have those shiny boots?</string></lines></OldManQuote></quotes></OldManItem></items>
Replace YOUR_ITEM_TRIGGER with the wearable item you want the quote(s) to unlock with.
Get rid of all the string tags that could be present.
Copy the following snippet:
<string>YOUR_STRING_HERE</string>
Replace YOUR_STRING_HERE with your string.
You can add as many strings as you want, just copy the snippet in a line after your closing string tag and replace YOUR_STRING_HERE with your second, third… string.
You can even add as many group of strings as you want by copying the OldManQuote tag and pasting it below the closing tag of the previous OldManQuote.
You can even add more screen checks!
By copying the existing entire OldManItem (or copying it from above) and pasting it right after the closing tag (in a new line) of the OldManItem you’ve just done, you can add another item check and a bunch of new speeches!
Fall quotes
Setting fall quotes
Search for the falls tag.
If you are missing falls paste the following snippet below talking_speed.
<falls><OldManItem><fallStart>YOUR_FALL_NUMBER_START</fallStart><fallEnd>YOUR_FALL_NUMBER_END</fallEnd><quotes><OldManQuote><lines><string>Oh hey you again! Haha!</string><string>I've seen you fall here at least five times already!</string></lines></OldManQuote></quotes></OldManItem></falls>
Replace YOUR_FALL_NUMBER_START with the starting number of falls you want the quote(s) to unlock with.
Replace YOUR_FALL_NUMBER_END with the ending number of falls you want the quote(s) to unlock with.
Get rid of all the string tags that could be present.
Copy the following snippet:
<string>YOUR_STRING_HERE</string>
Replace YOUR_STRING_HERE with your string.
You can add as many strings as you want, just copy the snippet in a line after your closing string tag and replace YOUR_STRING_HERE with your second, third… string.
You can even add as many group of strings as you want by copying the OldManQuote tag and pasting it below the closing tag of the previous OldManQuote.
You can even add more screen checks!
By copying the existing entire OldManFall (or copying it from above) and pasting it right after the closing tag (in a new line) of the OldManFall you’ve just done, you can add another fall check and a bunch of new speeches!